
In this guide
A printable colouring book arrives as a PDF. Turning it into something a child can hold, flip through and carry around takes about ten minutes and things you probably already have: a printer, paper, and a stapler or hole punch. This guide covers the whole job, from picking the right file to binding the pages so they survive a week of enthusiastic use.
For the technical side of printing (scaling, printer dialogues and troubleshooting), see our step-by-step page on how to print a colouring book at home. This guide is about making the book.
1. Choose the right file and paper
Most printable colouring books, including ours, come in two page sizes. Use A4 if you are in Australia, New Zealand, the UK or most other countries, and US Letter if you are in the US or Canada. The two files hold the same pictures; the difference is only the shape of the page.
For paper, match it to the tools your child will use. Ordinary 80 gsm copy paper is fine for crayons and pencils. If markers or textas are the favourite, a heavier 120–160 gsm paper stops ink soaking through. Our guide to the best paper for colouring pages explains the options and how to check what your printer can take.
2. Get the print settings right
- Scale: Actual Size or 100%. “Fit to page” can shrink the picture slightly. That is not a disaster, but it can trim margins unevenly.
- One page per sheet. Avoid “booklet” or “2 pages per sheet” modes unless you specifically want a smaller A5 book (see below).
- Single-sided. Colouring pages are best printed on one side only. Markers show through, and children often want to pull out a favourite page to stick on the fridge.
- Print one test page first. Check the lines are dark enough and the edges are not cut off before you print twenty pages.

3. Decide what to print (you do not need the whole book)
A homemade colouring book does not have to be every page of the PDF. Use the page range box in the print dialogue to print what fits the moment:
- A mini book. Five or six favourite pictures plus a cover makes a book a child can finish, which feels great.
- A themed book. Mix pages from different books around one idea, for example a “things that go” book with pages from Cars and Road Vehicles, Aircraft Up Close and Boats and Ships.
- A travel book. Eight to ten pages, stapled, with a pencil case of crayons, for car trips and waiting rooms.
Keep the colour guide separate. If your book includes a matching colour guide (all Puddleleaf books do), you can keep it on a tablet or print only the guide pages for the pictures you chose. Stapling the guide inside the book can make it feel like there is a “right answer” on every page.
4. Five ways to bind it
Corner staple (two minutes)
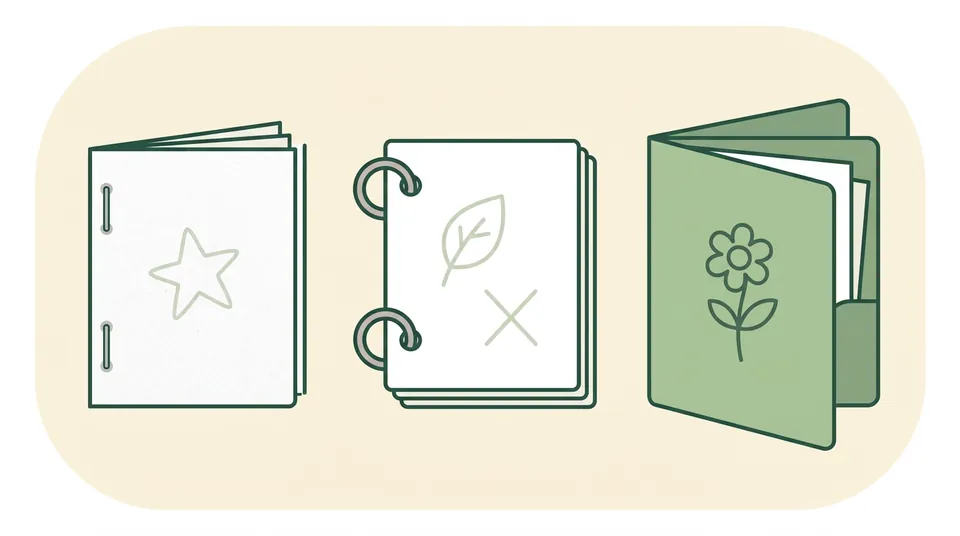
Stack the pages, line up the edges by tapping them on the table, and put one staple in the top-left corner. It is fast and good for up to about ten sheets, but pages do not turn flat, so it suits younger children who colour one page at a time.
Side staples (five minutes)
Put two or three staples down the left edge, about a centimetre in. Fold a strip of coloured tape over the staples to cover sharp ends and make a neat spine. The book opens more like a real book.
Hole punch and ribbon, rings or treasury tags
Punch two holes on the left and tie them with ribbon or wool, or use binder rings or treasury tags. This is the best option for a growing book: children can add pages, take one out to display, or reorder them. Reinforcement rings stop holes tearing.
Display folder or clear sleeves
A display book with clear pockets keeps finished pages clean and is perfect for a “best work” collection. Slide pages in after they are coloured rather than before.
A folded A5 booklet
If you want a small book, your printer’s booklet mode can print two pages on each side of a sheet, which you then fold and staple in the middle. Be aware that this shrinks each page to half size, so details get smaller and harder to colour. It suits older children and simpler pictures; for ages 4–6, full-size pages are usually easier.
5. Make the cover theirs
A cover turns a stack of pages into “my book”. Print the book’s cover page on heavier paper or card if your printer can take it, or let your child design their own on a blank sheet: their name, a title and a drawing. Some children like to add a “by” line and a little “about the artist” note on the back. Ask them what the book is called; the answers are often wonderful.
6. Making books for a classroom or group
For a class, print and collate one set per child before the lesson, and staple in advance. Write names on covers first so books do not get mixed up. Before you copy a paid book for a group, check its licence: ours permit one household or one educator’s own noncommercial classroom or small group, and do not allow sharing the files themselves.
Quick checklist
- Right file: A4 or US Letter
- Right paper for the tools you are using
- Actual Size / 100%, single-sided, test page first
- Choose pages, not necessarily the whole book
- Bind: staples, rings, folder or booklet
- Add a cover with the child’s name
Want to try before you buy? Every book has a free sample. Start with our free colouring pages and make a mini book from three or four of them.